QR code generator and reader/scanner in Python

Hi guys

Nowadays we see a lot of QR codes being used in commercial businesses, especially for transaction. QR code generator can encode many different kinds of data, such as plain text, website link (http or https protocol), vcard, geolocation and call.

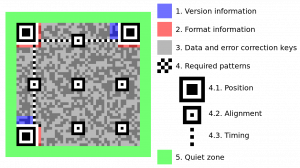
There are several standards of QR codes. According to Wikipedia, there are four layers of structure of a QR code, as shown in the image below:

I am going to write tutorial on how to generate QR codes using qrcode Python package available at the PyPi website.

Part 1: Generate QR code using qrcode

Install qrcode package by using pip:

pip install qrcode

You should have a new command ‘qr’ in the terminal. From terminal (if you’re in UNIX/Linux environment) or command prompt (Windows), type:

qr "https://naimibrahim.me" > qrcode.png

It should generate an image in PNG format with the generated text encoded, like below:

For more advanced usage, please refer to the documentation.

Part 2: Read/scan QR code using zbarlight

My choice of package to read QR image is zbar, and its wrapper – zbarlight.

Firstly, download zbar source ball from its website http://zbar.sourceforge.net/download.html and compile it, or use the existing binary for your operating system.

from PIL import Image
import zbarlight
import sys

if len(sys.argv) < 2:
    exit
file_path = sys.argv[1]
with open(file_path, 'rb') as image_file:
    image = Image.open(image_file)
    image.load()

codes = zbarlight.scan_codes('qrcode', image)
print('QR codes: %s' % codes)

Run the above qrcode_scanner.py script by executing:

python qrcode_scanner.py qrcode.png

The output should be:

QR codes: [b'https://naimibrahim.me']

Now, you can even set up a web service to generate QR codes from your visitors, or print QR codes on pamphlets based on requirements from your customers, or any other idea that you have 🙂

AngularJS Typescript – Wait for asynchronous promise to resolve

For example, we want to have a function to resolve a value of 10.

function1() {
  return new Promise(resolve => {
    // some long processing
    resolve(10);
  }
}

To call the function,

function1().then(response => console.log(response));
console.log(2);

There are two scenarios. Either the output would be:

10
2

or

2
10

It is because it depends on how long it takes for function1() to resolve or finish its execution.

If we want to wait until function1() to finish execution before we print out ‘2’ to console, then we have to do:

var promise1 = function1();
Promise.resolve(promise1).then(response => {
  console.log(response);
});
console.log(2);

The output would be:

10
2

If we have two functions that return a Promise, then to wait until both functions finish execution before executing another statement is as following:

var promise1 = function1(); // returns 2
var promise2 = function2(); // returns 10
Promise.all([promise1, promise2]).resolve([value1, value2] => {
  console.log(value1);
  console.log(value2);
});

The output is:

2
10

EmguCV 3.x – Read and display local video file (C# .NET Visual Studio)

We are going to create a GUI application on Windows desktop using WPF on Visual Studio that reads and displays video file.

Firstly, let’s create a Window and put the following codes into its .xaml file:

< Window x:Class="NaimIbrahim.MainWindow"
        xmlns="http://schemas.microsoft.com/winfx/2006/xaml/presentation"
        xmlns:x="http://schemas.microsoft.com/winfx/2006/xaml"
        xmlns:d="http://schemas.microsoft.com/expression/blend/2008"
        xmlns:mc="http://schemas.openxmlformats.org/markup-compatibility/2006"
        xmlns:local="clr-namespace:NaimIbrahim"
        mc:Ignorable="d"
        Title="MainWindow" 
        WindowState="Maximized"
        >
    < Grid>
        < Grid.RowDefinitions>
            < RowDefinition Height="*"/>
            < RowDefinition Height="Auto"/>
            < RowDefinition Height="Auto"/>
        < /Grid.RowDefinitions>
        < Grid.ColumnDefinitions>
            < ColumnDefinition Width="*"/>
            < ColumnDefinition Width="0"/>
        < /Grid.ColumnDefinitions>
        < Image x:Name="imageBox" HorizontalAlignment="Center" Grid.Row="0" Grid.Column="0"/>
        < StackPanel Grid.Row="1" Grid.Column="0" Orientation="Horizontal" Margin="0,20,0,20" HorizontalAlignment="Center">
            < Button x:Name="btnOpen" Content="Open" Width="75" Margin="0,0,20,0" Click="btnOpen_Click"/>
            < Button x:Name="btnPause" Content="Pause" Width="75" Click="btnPause_Click"/>
        < /StackPanel>
    < /Grid>
< /Window>

The window will be on maximized screen, and it will have two buttons: Open and Pause.

Next, we will need to install EmguCV library or dependencies into our project solution. Right click on project solution, click ‘Manage NuGet packages for solution’. Search ‘EmguCV’ and install the NuGet package into your project. You can verify that EmguCV DLLs are installed to your project by browsing on the References menu. You can also manually download and install the EmguCV DLLs by following the instruction on EmguCV official website.

In the .cs file of the window, add the following objects into our class:

private Emgu.CV.Capture capture;
System.Windows.Threading.DispatcherTimer dispatcherTimer = new System.Windows.Threading.DispatcherTimer();

The capture object is to capture video from file, and dispatcherTimer object is to continuously read the video at every defined interval.

public MainWindow()
{
	InitializeComponent();
	Loaded += MainWindow_Loaded;

	dispatcherTimer.Tick += dispatcherTimer_Tick;
	dispatcherTimer.Interval = TimeSpan.FromMilliseconds(1000.0 / 60.0);
}

Line #4 is to read some codes once the window is loaded. Line #6 is to re-read our dispatcher function at every tick. Line #7 is to set the interval at 60 FPS (frames per second, a standard value)

void MainWindow_Loaded(object sender, EventArgs e)
{
	btnOpen.IsEnabled = true;
	btnPause.IsEnabled = false;
}

Once window is loaded, we disable the Pause button because no video is being played yet.

private void dispatcherTimer_Tick(object sender, EventArgs e)
{
	if (capture != null)
	{
		Mat mat = capture.QueryFrame();
		if (mat != null)
		{
			Image img = mat.ToImage();
			imageBox.Source = BitmapSourceConvert.ToBitmapSource(img);
		}
	}
}

The above function gets executed at every tick, that is 60 FPS. If a video file is captured, then read its frame and convert the frame to ImageSource by using a class I put at the bottom of this post.

private void btnOpen_Click(object sender, RoutedEventArgs e)
{
	OpenFileDialog openFileDialog = new OpenFileDialog();
	if (openFileDialog.ShowDialog() == true)
	{
		capture = new Emgu.CV.Capture(openFileDialog.FileName.ToString());
		dispatcherTimer.Start();
		btnPause.IsEnabled = true;
	}
}

A user clicks on the Open button and will be asked to choose a video file. Once a video is selected, we start the dispatcher timer and set the Pause button to be enabled.

private void btnPause_Click(object sender, RoutedEventArgs e)
{
	if (dispatcherTimer.IsEnabled)
	{
		dispatcherTimer.Stop();
		btnPause.Content = "Resume";
	} else
	{
		dispatcherTimer.Start();
		btnPause.Content = "Pause";
	}
	
}

And finally, the function invoked when the Pause button is clicked.

private System.Drawing.Bitmap BitmapFromSource(BitmapSource bitmapsource)
{
	System.Drawing.Bitmap bitmap;
	using (MemoryStream outStream = new MemoryStream())
	{
		BitmapEncoder enc = new BmpBitmapEncoder();
		enc.Frames.Add(BitmapFrame.Create(bitmapsource));
		enc.Save(outStream);
		bitmap = new System.Drawing.Bitmap(outStream);
	}
	return bitmap;
}
Django REST Framework over NodeJS for Backend RESTful API

As I write, I’m a backend team lead for a Singaporean startup that develop an e-commerce platform. We decide to use Django REST Framework over NodeJS as backend application for CRUD operations of models from the front-end side (mobile app).

Listed below are some of the reasons why Django REST Framework wins over NodeJS:

    1. Easily define models/classes and use of inheritance
      class User(AbstractBaseUser, PermissionsMixin):
      created = models.DateTimeField(default=timezone.now)
      email = models.EmailField(unique=True, db_index=True)
      username = models.CharField(max_length=50, unique=True, blank=False)
      first_name = models.CharField(max_length=100, blank=False)
      last_name = models.CharField(max_length=100, blank=False)
      USERNAME_FIELD = 'username'
      REQUIRED_FIELDS = ['email', 'first_name', 'last_name']
      
      class Meta:
      verbose_name = 'user'
      verbose_name_plural = 'users'
      db_table = 'users'
      

      Very fast prototyping, isn’t it?

    2. Systematic and neat API URLs configuration
      Unless you develop a very small app, you can manage the API URLs easily by importing each app module URL configuration file into the main app URL configuration file
    3. Easy database models/tables migration
      You modify a model and Django will create a migration file to alter your database table structure
    4. Many packages available
      Thousands of available modules or packages at https://pypi.python.org/pypi to shorten your time to develop software
    5. Use of Python
      Python is an easy-to-learn programming language. For example:
      # Print Fibonacci numbers less than 10:

      >>> # Fibonacci series:
      ... # the sum of two elements defines the next
      ... a, b = 0, 1
      >>> while b < 10:
      ...     print(b)
      ...     a, b = b, a+b
      

There are some other advantages, you'll find out when you use it 🙂 .

Ionic Native Geolocation – Error getting location (Android)

I was literally scratching my head for the last few days to figure out why my codes couldn’t read geolocation values (latitude and longitude).

import { Geolocation } from '@ionic-native/geolocation';
...
constructor(private geolocation: Geolocation) {}
...
this.geolocation.getCurrentPosition().then((resp) => {
// resp.coords.latitude
// resp.coords.longitude
}).catch((error) => {
console.log('Error getting location', error);
});

let watch = this.geolocation.watchPosition();
watch.subscribe((data) => {
// data can be a set of coordinates, or an error (if an error occurred).
// data.coords.latitude
// data.coords.longitude
});

Solution:
You’ll have to insert the following lines into your AndroidManifest.xml and rebuild your app:

;

The lines ask for permission from Android to let the app reads location of the device.